- Home »
- Our Products »
- ROHS/WEEE/EOLV/CPSIA »
- XRF Spectrometer : ROHS Screening XDV-SDD
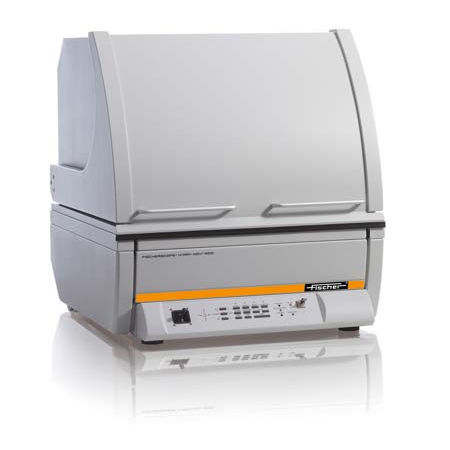
XRF Spectrometer : ROHS Screening XDV-SDD
The high-end measurement system Fischerscope X-Ray XAN SDD was developed specifically for non destructive, high precision analysis of thin gold and precious metal coatings. These are basically X-ray fluorescence measuring instrument with a programmable XY-stage and Z-Axis for Automated Measurements of very thin coatings and for trace analysis. These are extensively used as an energy-dispersive X-ray fluorescence measuring instrument for the measurement and analysis of very thin coatings or small concentrations in the trace analysis.
Design
- These are universally applicable energy-dispersive X-ray fluorescence measuring instrument widely used for measuring and analyzing very thin coatings or small concentrations in the trace analysis.
- These have programmable XY-stage, which make these perfect for auto-mated sample measurements.
- These are featured with electrically changeable apertures and primary filters and modern silicon drift detector to ensure high accuracy, good detection sensitivity, long term stability and outstanding accuracy.
- These are widely recommended by clients owing to its precise design, robust design, longer service life and effective usage.
- These are user-friendly bench-top instrument equipped with programmable XY-stage and an electrically driven Z-axis for automatic measurement.
- These are also fitted with a laser pointer, integrated video-microscope with zoom, protective hood and cross-Hairs simplifies sample placement for perfect measurement.
- These are operated using the powerful and user-friendly WinFTM software, for entire operation and evaluation of measurements as well as the clear presentation of measurement data is performed on a PC.
Typical areas of application are:
- Analysis of very thin coatings, e.g. gold/palladium coatings of 0.1 m
- Trace analysis on pc boards according to ROHS and WEEE requirements
- Gold analysis
- Measurement of functional coatings in the electronics and semiconductor industries
- Determination of complex multi-coating systems
- Automated measurements, e.g., in quality control
General Specification
- Intended use: Energy dispersive X-ray fluorescence measuring instrument (EDXRF) to determine thin coatings and alloys
- Element range: Aluminum Al (13) to Uranium U (92) up to 24 elements simultaneously
- Design: Bench-top unit with hood opening upwards XY-stage and Z-axis electrically driven and programmable,Motor-driven changeable apertures and filters Video camera and laser pointer (class 1) for orienting the sample
- Measuring direction: From top to bottom
X-Ray Source
- X-ray tube Micro focus tungsten tube with beryllium window
- High voltage Three steps 10 kV, 30 kV, 50 kV
- Aperture (Collimator): 4x changeable: 0.2 mm (7.9 mils), 0,6 mm (23.6 mils), 1 mm (39.4 mils), 3 mm (118 mils), others on request
- Primary filter: 6x changeable (Ni, free, Al 1000 m (39.4 mils), Al 500 m (19.7 mils), Al 100 m (3.9 mils), Mylar 100 m (3.9 mils)
- Measurement spot size: Depending on measurement distance and aperture,Measurement spot size aperture size + 10% The actual measurement spot size is shown in the video image.Smallest measurement spot: approx. 0.25 mm (9.8 mils)
X-Ray Detection
- X-ray detectorSilicon Drift Detector (SDD), peltier-cooled
- Resolution (fwhm for Mn-K±)°140 eV
- Measurement distance:0 80 mm (0 3.1 in) Distance compensation with patented DCM method for simplified measurements at varying distances. For particular applications or for higher demands on accuracy an additional calibration might be necessary.
Sample Alignment
- Video microscope High-resolution CCD color camera for optical monitoring of the measurement location along the primary beam axis,manual focusing and auto-focus, crosshairs with a calibrated scale (ruler) and spot-indicator,adjustable LED illumination, laser pointer (class 1) to support accurate sample placement.
- Zoom factor Digital 1x, 2x, 3x, 4x
- Focusing Auto-focus and manually controlled motor focus.
Manual adjustment of the focal plane in a range from 0 to 80 mm.
- Design Fast, programmable XY-stage with pop-out function
- Maximum travel X/Y-axis: 250 mm x 250 mm (9.8 x 9.8 in); Z-axis: 140 mm (5.5 in)
- Max. travel speed 60 mm/s (0.2 ft/s)
- Repeatability precision XY unidirectional: ° 5 m (0.2 mils) max., ° 2 m (0.08 mils) typ.
- Usable sample placement area 370 x 320 mm (14.6 x 12.6 in)
- Max. sample weight5 kg (11 lb), with reduced approach travel precision 20 kg (44 lb)
- Max. sample height 140 mm (5.5 in)
Electrical Data
- Power supply AC 115 V or AC 230 V 50 / 60 Hz
- Power consumption Max. 120 W ,without evaluation PC
- Protection class IP40
Dimensions
- External dimensions
Width x depth x height [mm]:660 x 835 x 720 mm, [in]: 26 x 32.9 x 28.3 - Interior dimensions Width x depth x height [mm]: measurement chamber 580 x 560 x 145 mm, [in]: 22.8 x 22 x 5.7
- Weight Approx. 140 kg (308 lb)
Environmental Conditions
- Temperature: Operation10 °C 40 °C / 50 104 °F
- Temperature:0 °C â50 °C / 32 ° 122 °F
- Storage/Transport
- Admissible air humidity° 95 %, non-condensing
Evaluation Unit
- Computer Windows ®-PC
- Software Standard: Fischer WinFTM BASIC including PDM , Optional: Fischer WinFTM SUPER
Standards
- CE approval EN 61010
- X-Ray standards DIN ISO 3497 and ASTM B 568
- Approval Fully protected instrument with type approval according to the German regulations "Deutsche Rontgenverordnung-RoV".
Product details
| Power consumption | Max. 120 W,without evaluation PC |
| Protection class | IP40 |
| Weight | Approx. 140 kg (308 lb) |
| Temperature | 0 to 50 Deg C / 32 to 122 Deg F |
| Computer | Windows-PC |


